


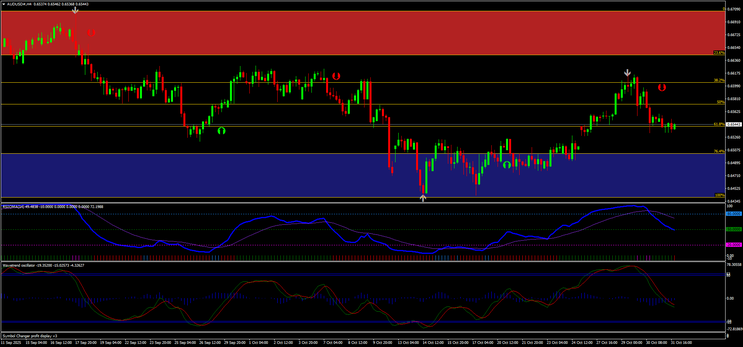
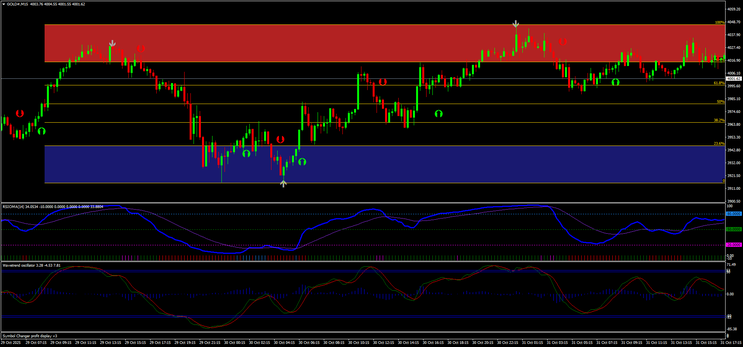
262# Auto-Fib Reversal System with RSIOMA & WaveTrend (MT4 Strategy)
This strategy focuses on trend reversal trading using supply–demand zones generated by the Auto-Fib Trade Zone indicator, supported by RSIOMA and WaveTrend confirmations.
It works best on 5-minute or higher timeframes.
Markets: Any currency pair, Gold, Indices, Crypto (on MT4).
Indicators Used
Main Chart
-
Auto Fib Trade Zone (default);
AK ZigZag (default);
Trend Arrow indicator (default).
Subwindow
-
WaveTrend Oscillator (default);
RSIOMA (default).
Trading Concept
Price tends to reverse from Auto-Fib Supply Zones (Red)
and Auto-Fib Demand Zones (Blue).
Entries are taken only when zone + indicator confluence occurs, confirming reversal pressure.
Buy Rules (Long Reversal)
Enter long when all conditions are met:
Zone & Price Action
-
Price enters the Demand Zone (Blue)
-
AK ZigZag forms a swing low in the zone
-
Bullish Trend Arrow appears near the low (green or up arrow)
Indicator Confirmation
-
RSIOMA crosses upward from below 20 or turns up from oversold
-
WaveTrend gives a bullish cross below the 0 line
-
Optional: Price breaks small internal structure (micro-HH on candles)
Entry
Place buy on candle close after confirmations
Stop Loss / Take Profit
-
SL: Below swing low or below the blue zone
-
TP1: 38.2% Fib level
TP2: 61.8% Fib level
TP3: Opposite zone (Red supply)
Exit early if: RSIOMA rolls down or WaveTrend crosses bearish again.

Sell Rules (Short Reversal)
Enter short when all conditions align:
Zone & Price Action
-
Price enters the Supply Zone (Red)
-
AK ZigZag forms a swing high inside zone
-
Bearish Trend Arrow appears near the high (red or down arrow)
Indicator Confirmation
-
RSIOMA turns down from overbought (above 80)
-
WaveTrend bearish cross above 0
-
Optional: Price breaks small internal structure (micro-LL)
Entry
Sell at candle close after all signals confirm
Stop Loss / Take Profit
-
SL: Above swing high / above red zone
TP1: 61.8% Fib
TP2: 38.2% Fib
TP3: Opposite zone (Blue demand)
Exit early if: RSIOMA turns upward or WaveTrend crosses bullish.
Additional Rules
-
Trade only one direction at a time
Avoid entries during major news
No trade if price is mid-Fib range (no zone touch)
Best trades occur when both RSIOMA & WaveTrend align
Trading Philosophy
Be patient and take trades only when price reaches a zone + both indicators
align.
Avoid trading in the middle of the Fib range — the highest probability setups form directly inside
zones.
Strategy Goal
This system aims to catch high-probability reversal trades at Fibonacci-based Supply (red) and Demand (blue) zones, using RSIOMA and WaveTrend to confirm momentum shifts and trend exhaustion.


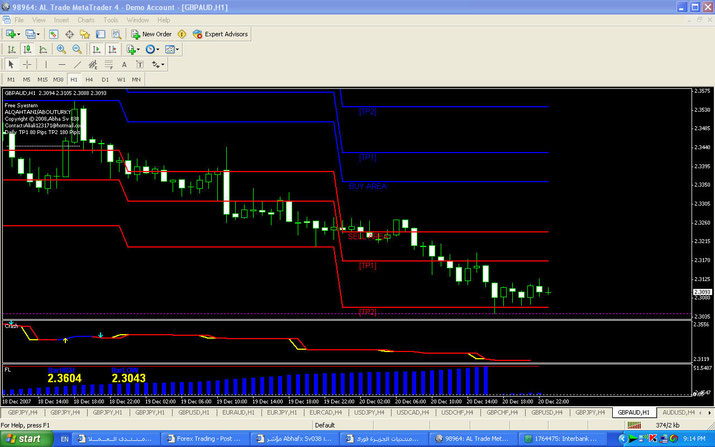
262# Free Scalping Trading System
Scalping Trading on the Levels
Submit by Jeff (Written by Abaha SV) 09/10/2012
This trading system is simple and profitable.
Time Frame H1
Currency pairs:any,
Metatrader indicators:
Float;
Volatility quality;
Abha sv 38.
Buy
Long entry on the level Buy area.
Sell
Short entry on the level Sell area.
Exit position on the target profit on the chart.
Stop loss 18-25 pips depnds by currency pairs.
Price Action Forex Strategies
168# Price Action Scalping III - Forex Strategies - Forex Resources
35# Price Action Fractal Scalping - Forex Strategies - Forex ...
23# Breakout Sqaulou - Forex Strategies - Forex Resources -
24# Box Breakout 3 - Forex Strategies - Forex Resources - Forex ...
38# Trendline Breakout - Forex Strategies - Forex Resources -
21# 15 min GBP/USD Range Breakout - Forex Strategies - Forex
26# The Retrotrader - Forex Strategies - Forex Resources - Forex ...
36# Tutorial Support and Resistance - Forex Strategies - Forex ...
2# Minor Reaction/Trend Resumption - Forex Strategies - Forex ...
9# SRDC Method Level I - Forex Strategies - Forex Resources ...
16# Mouteki System - Forex Strategies - Forex Resources - Forex ...
19# Set and Forget - Forex Strategies - Forex Resources - Forex ...
