


349# SMC Synthetic Momentum Strategy
MaximoTrader 2026
Synthetic Momentum strategy combines the Synthetic Pips indicator (for entry signals and zones), a fast MACD (7, 21, 6) (for momentum confirmation), and SMC (Smart Money Concepts) (for market structure and filtering).
Objective: To enter ongoing trends by catching pullbacks to key SMC zones (Order Blocks/Supply & Demand) confirmed by momentum indicators.
1. Indicator Setup
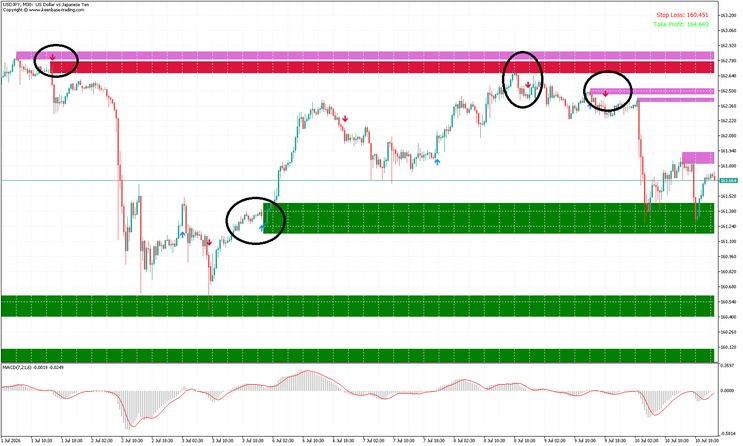
Synthetic Pips (Custom Indicator): This indicator appears to plot Colored Zones (Green for Demand/Support, Red/Purple for Supply/Resistance) and Arrows (Blue Up for Buy, Red Down for Sell). Role: Identifies key levels and trigger signals.
MACD (Moving Average Convergence Divergence): Fast EMA: 7, Slow EMA: 21, Signal SMA: 6. Role: Fast momentum filter to ensure you enter "in the ongoing movement."
SMC Filter (Manual or Automated): Role: Determines the bias. We only buy at "Discount" (Green Zones) and sell at "Premium" (Red/Purple Zones).
2. Trading Rules
Long (Buy) Setup Goal: Catch the upward move from a Demand Zone towards a Supply Zone.
SMC Filter (Context): Price must be reacting to a Green Zone (Demand/Order Block) or has recently broken structure upwards (BOS - Break of Structure). Ideally, the Higher Timeframe (H1) trend is bullish.
Signal (Trigger): The Synthetic Pips indicator prints a Blue Up Arrow.
Momentum Confirmation (MACD): The MACD Histogram must be rising (becoming less negative or turning positive). Aggressive Entry: MACD Line crosses above Signal Line. Conservative Entry: MACD Histogram is simply increasing (showing upward momentum).
Entry: Open Buy position at the close of the candle with the Blue Arrow.
Short (Sell) Setup Goal: Catch the downward move from a Supply Zone towards a Demand Zone.
SMC Filter (Context): Price must be reacting to a Red or Purple Zone (Supply/Order Block) or has recently broken structure downwards.
Signal (Trigger): The Synthetic Pips indicator prints a Red Down Arrow.
Momentum Confirmation (MACD): The MACD Histogram must be falling (becoming less positive or turning negative). Aggressive Entry: MACD Line crosses below Signal Line.
Entry: Open Sell position at the close of the candle with the Red Arrow.
3. Risk Management (Stop Loss & Take Profit)
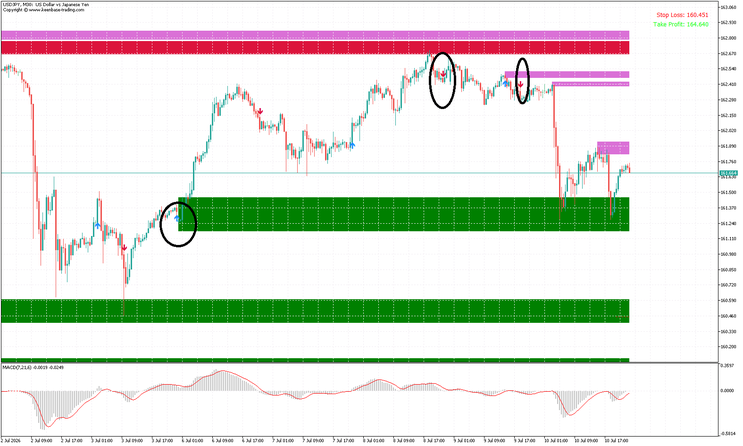
Based on the levels shown in your charts (e.g., SL: 160.451, TP: 164.640), this strategy uses wide swings typical of SMC.
Stop Loss (SL): Buy: Place SL slightly below the recent Swing Low or below the Green Demand Zone. (In your chart, the SL is very wide, likely below the major structural low). Sell: Place SL slightly above the recent Swing High or above the Red/Purple Supply Zone.
Take Profit (TP): Buy: Target the next major Red/Purple Supply Zone (Resistance). Sell: Target the next major Green Demand Zone (Support). Alternative: Use a fixed Risk:Reward ratio of 1:2 or 1:3.
Summary of Strategy Logic from Charts:
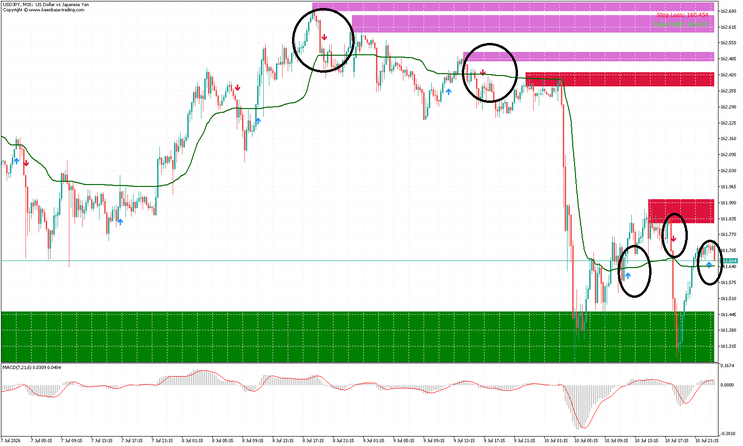
Chart 1 & 2 (USDJPY M30): You can see a massive drop, then a recovery. The Green Zone (around 161.240) acted as a floor. The strategy would trigger a Buy when the price bounced off this zone and the MACD started turning up (around July 6-7).
Chart 3 (USDJPY M15): Shows a sharp drop from a Red Zone (Supply). The strategy would trigger a Sell when the Red Arrow appeared at the top (around July 8) while MACD was high and starting to curl down.
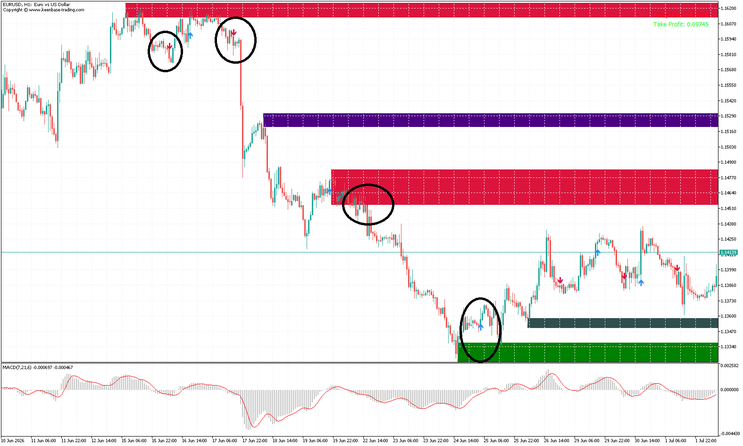
Chart 4 (EURUSD H1): Shows price trapped between a Red Zone (1.14640) and a Green Zone (1.13340). The strategy is to Sell at the Red zone and Buy at the Green zone.

349# kumo Trading System
Submit by JanusTrader and Maximo Trader 10/06/2012
TimeFrame 30 min
Currency pairs:any.
Indicators:
Ichi360
Awesome
MACD (5, 13, 1)
ZB.Cloud Matrix (signal arows true)
Fibonacci pivots
Long Entry
ArrowsZB cloud Matrix confirmed by:
ichi bullish>50%
Awesome>0
MACD>0
Short Entry
ArrowsZB cloud Matrix confirmed by:
ichi bullish<50%
Awesome<0
MACD<0
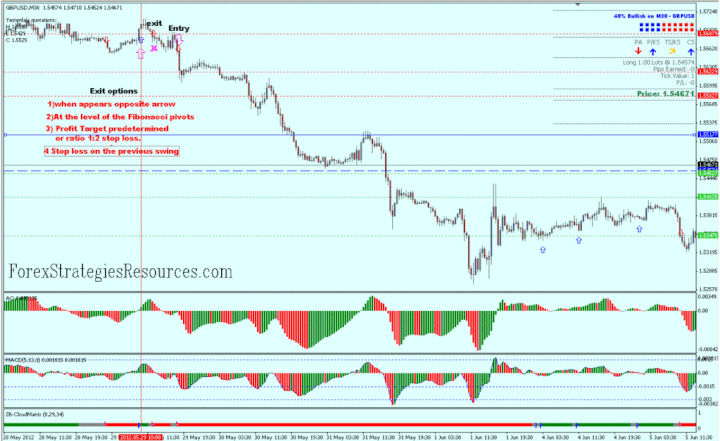
Exit position
1)when appears opposite arrow (speculative trade)
2)At the level of the Fibonacci pivots
3) Profit Target predetermined, depends by time frame and currency, or ratio 1:2 stop loss.
4 Stop loss on the previous swing.
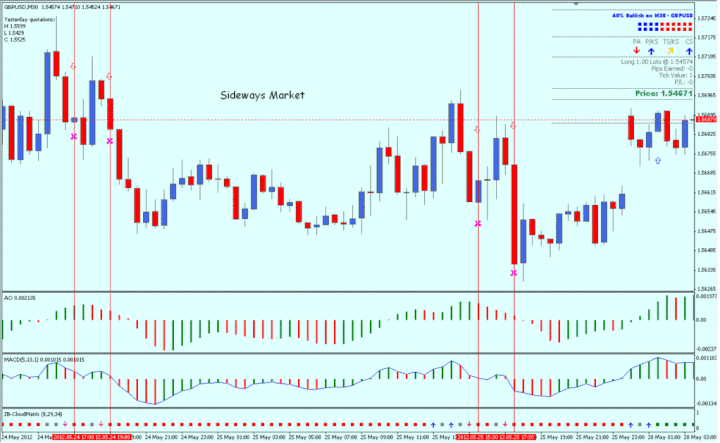
In the pictures kumo forex system in action.
-
#1
20
